Why Drywall Repair Is Necessary

Drywall Services

Drywall is found throughout most homes and is susceptible to various sources of damage. From dents to cracks, it’s fairly easy for these minor issues to become larger problems that require a major drywall repair project. You can typically get the job done with some spackle, a putty knife, and sandpaper for nail holes and other small blemishes. But bigger repairs may require some extra help.

Drywall ServicesDrywall is found throughout homes, from bedrooms and hallways to ceilings and basements. Over time, normal wear and tear can cause cracks, holes, and dents that aren’t necessarily structurally dangerous but are certainly unsightly. While a fresh coat of paint might temporarily hide these issues, a professional Drywall Repair Las Vegas must fix the underlying problems and ensure your walls and ceilings are safe.

While plenty of drywall patch kits are on the market, they often require a long drying time and sanding that can be difficult for homeowners to accomplish. In contrast, a product like the Eclipse(r) Rapid Wall Repair Patch can make the job go faster and easier while also delivering that super smooth, finished look that even some perfectionists might be after.

Before you begin drywall repairs, it’s important to lay down drop cloths or tarps to catch all the pieces of drywall that will be removed and to protect surrounding surfaces from dust and debris. It’s also a good idea to put on some sturdy work gloves and safety goggles as working with drywall creates a lot of fine dust that can be irritating to the eyes and nose.

When two sheets of drywall meet at a corner, they’re protected by an L-shaped metal strip called a corner bead that is nailed to the corners and concealed with several layers of joint compound. Despite its toughness, this bead is not indestructible and can get dented from run-ins with the vacuum cleaner or from kids flinging toys into the corner. When this happens, removing the affected section of drywall is simple enough, but it’s important to carefully mark out the area before using a power saw so that you don’t accidentally cut into the wood framing beneath the drywall.

Nail and screw pops are another common issue caused by lumber shrinkage that can leave exposed fasteners behind. If you can see the nail head, gently pound a pry bar underneath the surface of the drywall until it pops up and then use a hammer to nudge the nail out.

Patching the Holes

Drywall repair is a skill that every home renovator should learn. It’s not difficult, and it’s one of the most satisfying home improvement tasks for anyone to do. Whether you’re a serial renter or a bona fide homeowner, drywall patching can save your bacon when something goes wrong in your home. It’s also useful for those wishing to spruce up their homes on a budget.

Most holes in drywall are caused by either accident or intent, such as accidentally swinging a doorknob too hard or using the wall to hang paintings or mirrors. Small dents and dings that have not significantly weakened the drywall are easily repaired with a spackle or drywall compound.

If the hole is large, however, you may need to cut a new piece of drywall to replace it and add extra support. This type of drywall patch is typically supported by strips of wood installed inside the gap on both sides. This prevents the patch from collapsing into the hole.

You can purchase a pre-mixed drywall patch kit for this type of repair, which is easier and faster than mixing your own compound. The patch itself is essentially a sheet of drywall with an adhesive backing that sticks to the wall. To prepare it, you need to clear away any loose or chipped edges and ensure that the surface is smooth. You should also tie a string around the center of the patch and use it to pull it gently into place against the wall.

To make a custom drywall patch, measure the dimensions of the damaged area and then cut a piece of drywall to fit it. If the hole is near a joint, you should lay down some 1/8-inch-thick bed of drywall compound and press paper tape into it. Next, spread a second coat of compound, working it at least 6 inches beyond the edge of the first coat to create a taped seam.

After the drywall patch has dried, you should lightly sand it with 100-grit sandpaper to remove any ridges and blend it with the surrounding wall. At this point, you can re-paint the patched area to match the rest of the wall.

Applying Joint Compound

Drywall compound is a gypsum-based mixture that helps give walls a finished look by securing drywall tape, sealing seams and covering nail and screw holes. It is available in setting-type and premixed varieties. Choose the kind that best matches the conditions of your project.

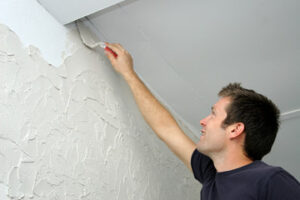
When applying the compound to a surface, always apply a thin coat. This allows the compound to dry and sand more easily without leaving an uneven or patchy surface. It is also a good idea to use a sanding sponge instead of a regular sandpaper to ensure that the area is smooth and ready for painting.

If you notice a hairline crack that is not going to get any larger, sand the area with a sanding sponge and vacuum away any loose dust before applying a second thin coat of joint compound. This will discourage the crack from reappearing and help prevent it from becoming worse over time.

It is important to keep in mind that both sanding and using joint compound produce a lot of dust. You should wear a mask or respirator to avoid breathing the dust. It contains super-fine gypsum and silica particulates that can irritate your respiratory system.

Unlike spackle, drywall joint compound is designed to cover the seams that lay between two pieces of drywall. To make the process easier, first cut the paper tape into lengths that are equal to the height of the seam you’re working on.

Next, use a trowel to apply a thin coat of drywall joint compound over the exposed seams. Then press the tape into place and apply another coat of compound over the top of it. Once the second coat of compound has dried, sand it with a sanding sponge to remove any ridges and smooth the surface of the wall.

Once the sanding and compound have been completed, you’ll need to prime and paint the repaired area. It’s a good idea to test the color of the paint on an inconspicuous part of the wall to ensure that it matches the rest of the room.

Overall, the entire drywall repair process should not take more than four days if you have experience with DIY projects. However, if the damage is severe and requires new drywall to be installed, you may want to consider hiring a professional.

Finishing the Job

The interior walls and ceilings of most homes are covered with gypsum wallboard, more commonly known as drywall or Sheetrock. While it is fairly durable, drywall can only take so much abuse before holes, cracks, and dents start to appear. If left unattended, even these small imperfections can make your home look sloppy and can lead to costly repairs.

For the do-it-yourselfer, repairing drywall damage is actually quite an easy project. For smaller holes, a patch kit and some drywall compound or spackles are all that is required to conceal the problem. However, bigger projects can be tricky. Nail pops, in particular, can be a challenge to repair for many people. This occurs when nails holding the drywall begin to pop through the plaster and paint that conceals them. This type of drywall repair requires skill and experience with plaster texturing techniques. If you are not accustomed to working with plaster, it is best to leave nail pops to the professionals.

Other issues that require drywall repair include dents and long, tiny cracks. These cracks are caused by the expansion and contraction of the wooden studs that the drywall is attached to. This is normal and happens in every home and commercial building, but can cause problems with the drywall if not addressed quickly enough. It is important to note that cracks in drywall can also indicate a serious structural issue and it is recommended that these be checked by a professional.

Once the drywall has been repaired, it is necessary to let it dry. This process can take up to three hours and it is important that you keep the area as well ventilated as possible. Once the drywall is completely dry, a light sanding with a sanding sponge can help to smooth out any uneven areas and to give your drywall a nice finish.

When it comes to drywall repair, the more extensive the job, the longer it will take to complete. It is also important to remember that you must wait for the drywall to fully cure before painting it. This can be a few days or even a week, depending on the environmental conditions and the size of the damage.

Tools For the Handyman

Handyman

Handyman Naperville IL can make a good living by offering various services to homeowners. It’s important to focus on the right clients. If a client is interviewing multiple handypersons, badmouthing their previous contractor, or giving vague instructions, steer clear of them and find another customer. It’s also important to have the right tools. Check out this list of the best handyman tools to help you get started.

HandymanThe fish tape is a wire that handymen can use to pull cables through walls, floors and conduit. This is an excellent tool to use when there are existing electrical circuits in a home, office or other building that need to be run elsewhere. It can also be used to add new lighting fixtures, appliances or other electrical equipment. A specialized tool with a plastic-coated steel wire, it is durable and can be bent without breaking. It is available in different lengths and thicknesses.

Most fish tapes are stored coiled on a reel that allows the user to quickly access the right length of tape for each job. They have a slight curve that helps guide them into tight spaces. A handyman may want to consider non-conductive fiberglass fish tapes as they do not conduct electricity and can help reduce the risk of shock when working around energized circuits.

It is important to turn off the power to any electric circuits before using fish tape in a residential or commercial space. This will prevent the possibility of accidental contact with live wires. A handyman should also consider the use of an insulated fish tape that has been tested to be non-conductive and resists voltages up to 1000V.

Typically, these fish tapes will have supports ties wrapped around them to hold them in a coiled shape while they are not being used. When they are ready to be used, the support ties must be removed before pulling on the tape. Some types of fish tape have a button that must be pushed before the tape can be pulled out, while others simply require the user to grab onto it and pull it out.

Electrical Tape

Electrical tape is a general purpose insulating tape with a pressure-sensitive adhesive. It’s used to wrap and insulate electrical wires, as well as other material that conducts electricity. It’s usually made of vinyl or PVC and comes in a variety of colors for color-coding wire applications. In addition, electrical tape can withstand moisture and humidity.

It’s important to note that before using any electrical tape, the handyman must ensure that the area’s power is completely off. This is to prevent potential electric shock from the taping process. It’s also a good idea to use a voltage tester to check for current in the area.

When it comes to buying electrical tape, the first thing that a handyman should consider is its stretch and elongation capabilities. This is because electrical tape needs to be stretched and tightly wound around a wire in order to effectively adhere. A low-quality tape may not be able to elongate as much before breaking, which can make it difficult to use.

The next step is to look for an electrical tape that carries Underwriters Laboratories (UL) approval. This is to ensure that it has been tested based on national safety standards. Finally, a handyman should choose an electrical tape that is thicker than the wire’s insulation in order to provide adequate protection. Otherwise, it could fail to adequately prevent the flow of electricity, which can result in a fire. Moreover, it is crucial to remember that binding wires with electrical tape should only be done as a temporary solution. Permanent connections should be made with wire nuts, which will offer a better and more durable solution. Nonetheless, electrical tape can be useful for making minor repairs to cables or ensuring that they are properly insulated.

Circular Saw

A circular saw is a powerful tool for any handyman. It can be intimidating to use, but with proper training and practice, it can provide great results for any project. Like any power tool, a circular saw is dangerous if not used properly. A handyman should always follow safety precautions when using this tool to avoid injury.

First, make sure the saw is fully unplugged or unattached from its battery and that it is not positioned on top of any material that could fall and be cut by the blade. Then, set up a straight edge guide to rest the side of the saw plate against. This will help you get a straight cut and prevent the blade from binding or causing kickback.

Then, attach the appropriate blade for your project. A standard wood cutting blade is fine for most projects, but you may need to switch to a metal-cutting or plastic-cutting blade for certain materials. Finally, plug in the cord or connect the battery and turn on the saw. The trigger is usually on the right side of the handle, and a thumb-activated safety switch keeps the blade from accidentally starting.

Most circular saws have notches on the base plate that line up with the cutting edge of the blade for 0° and 45° bevel cuts. This feature is helpful, but every blade is slightly different and a straightedge can be much more useful for achieving a perfectly straight cut. Once the cut is completed, wait for the blade to stop before lifting it from the material. Be sure to wear eye protection, ear protection and a dust mask to protect yourself from the loud noise and flying debris caused by the blade.

Hammer

A hammer is a hand tool consisting of a weighted head fixed to a long handle that can be swung to deliver an impact to an object. Hammers can be used to drive nails into wood, shape metal (as with a forge), or break things into pieces. They come in a variety of shapes, sizes and weights ranging from ounces to pounds. Most hammers are made of steel, but some have titanium heads.

Handymans use hammers for many different tasks, including installing home fixtures and appliances. They also use them to repair damaged walls and other structures. When choosing a hammer, it is important to choose one that is lightweight and well-balanced. A heavy hammer can cause wrist fatigue and may result in wild swings that could damage the item being hit.

Using a hammer effectively can be difficult for beginners, but there are some tips that can help them improve their technique. The first tip is to grip the hammer with the thumb and forefinger of the nondominant hand. This will prevent your fingers from getting crushed if the hammer misses its target. It is also important to use a smooth, controlled swing. Doing this will ensure that the hammer hits its target rather than the wood or other structure.

Another helpful tip is to place a stop loss below the low of the hammer pattern. This will protect the trade from a possible reemergence of downward pressure and allow for a quick exit if necessary. The level at which the stop is placed will depend on the trader’s confidence in the hammer signal and their risk tolerance. It is important to note that the hammer pattern does not provide a price target, so the trader will need to decide on an optimal exit level based on other types of candlestick analysis or other technical indicators.

Pliers

Pliers are a tool that every handyman should have in their arsenal to help them grip, position, tighten or loosen objects. They can also cut, which makes them ideal for a variety of home and workshop tasks. A good quality pair of pliers should have multiple jaw configurations for different uses and have several other features such as high leverage, locking and insulated handles.

The jaws (the part of the pliers that grip the object) come in various shapes and sizes and have different types of teeth and serrations to increase their gripping power. They may also be angled, tapered or have multiple sections of different shapes. Some pliers have a rounded head, which is useful for pulling nails or similar items. The handles (which the user squeezes) are covered with a variety of materials to provide comfort, with some models having insulated handles to protect against electric shocks.

Most pliers have a pivot point, which is where the two parts of the jaws meet. The closer the pivot point is to the jaws, the more gripping power and cutting capacity the pliers have. Some pliers have additional functions or features, such as a cutter, which can be used to cut wire of various thicknesses.

Other specialised pliers include slip joint, channel and locking varieties. For example, slip joint pliers have a sliding mechanism rather than a pivot point, which increases the distance between the jaws and allows them to grip wider objects. Channel pliers are great for cutting through pipes and other narrowly-sized items, while locking pliers can clamp down with a lot of force but should not be used on reusable fasteners as they could damage them.

Why You Should Hire a Residential Plumber

Plumbing

Plumbing services are a large part of everyday life. They keep our homes clean and functional and help us enjoy hot showers, clean sinks, and fully-functional toilets. Choosing one with the right skills and experience is important when looking for a plumber. You can also make sure they are licensed and insured.

PlumbingPlumbing systems are essential to any building, from residential homes to office buildings. They provide water, sewage, and drainage to maintain the entire space properly. You must hire a professional plumber to properly install your home’s plumbing. This will help to prevent any issues down the line, including leaks or burst pipes.

A plumber can install new piping, repair existing ones and maintain the system. This includes repairing or replacing septic tanks and sewer lines. The costs of installing plumbing vary depending on the size of the house and the materials used. You should also consider the number of bathrooms and other fixtures in the house and the labor hours required for each project.

Home owners will typically pay for a plumbing installation using a home equity line of credit (HELOC). This allows you to borrow as much or as little money as needed to complete the project. If you are unsure how much a plumbing installation will cost, ask your local contractor for a quote. They will be able to give you an estimate based on their experience.

The first step in a plumbing project is to map out the system. This involves determining the size and location of each pipe, including vents, drains and other connections. It will also be necessary to determine the layout of fixtures and appliances. In some cases, the plumber will need to cut away walls or ceilings to open up the path for the new piping. This is a time-consuming process, which requires specialized equipment and experience.

A plumber will then install the piping, taking care to make all of the seals and connections firm. Then he will turn the water back on and test to see that everything works correctly. Another way to lower the cost of a plumbing installation is to plan out the work ahead of time. This will help you to avoid overspending on the project, which can be a major factor in determining how much the overall job will cost.

A plumbing professional will be able to offer advice on how to reduce the cost of your installation by planning and organizing your work ahead of time. This will ensure that your plumbing work is done as efficiently as possible, and it will save you money in the long run.

Your home’s plumbing system is one of the most important components of your home. It supplies water for your household’s needs, including washing and bathing, and it helps to keep the outside of your house and landscaping healthy with fresh water.

However, the pipes and fixtures in your home can develop problems and require repairs. These can range from small problems such as a leaky faucet to a major plumbing emergency that can require the assistance of a professional plumber.

Depending on the nature of your problem, your plumber can handle it safely and efficiently. For example, if you need to replace an old toilet, your plumber will be able to install a new one with ease without harming the wall around it or any other pipes in your home.

Another benefit of hiring a plumber is that they can help you save money on your energy and water bills. They can suggest ways to conserve water, like removing weeds and using fertilizers sparingly. They also can recommend energy-efficient appliances that will save you money on your energy bill.

For example, a plumber can install low-flow showerheads and toilets that use less water. This can save you money on your water bill and help to protect the environment.

A plumber can also help you maintain your drains and prevent clogs. This is especially important for kitchen and bathroom drains that are vulnerable to food and hair clogs.

When your plumber comes out to inspect your drains and sewer line, they will use a number of tools to clear the gunk from your sewer lines. These include motorized drain augers, which can break up a clog before it becomes large enough to cause problems.

If you have a plumbing problem, call a plumber near you to schedule an appointment. This will ensure that your plumber can reach you quickly to assess the issue and fix it immediately.

Most homeowners are surprised when their plumbing systems experience problems such as drains that don’t drain or sewer lines that back up into their homes. These issues can be frustrating and costly to resolve, but they can be avoided by following a few simple maintenance tips.

A clogged drain is the most common plumbing problem in homes. They form when organic debris like food, hair, skin cells, soap scum, and other particles get stuck inside your pipes. This can lead to a serious clog or blockage that requires professional drain cleaning services.

A professional plumber will use snaking or hydro jetting techniques to unclog your drains and pipes. They also inspect your pipes and sewer lines to make sure they are free from blockages.

If you notice gurgling sounds in your pipes, air bubbles rising from your sink or shower, or sewage smells in the bathroom or kitchen, it is time to call a drain cleaner. A reputable plumber will check out your drain system, find the root cause of your issue and fix it in record time.

Another common sign of a drain blockage is slow drainage. A clogged drain can take up to 10 minutes to empty completely, and you may notice your sink or shower taking longer than normal.

These issues can also indicate a bigger issue that needs repair, such as a pipe bursting or an overflowing toilet, sink or shower. You should hire a drain cleaning professional as soon as these problems are discovered to avoid water damage and additional costs.

Residential plumbers will clean your drains with a combination of snaking, hydro jetting and other tools. This will help to remove the toughest clogs and prevent them from forming again.

They will use specialized snake augers and drain cameras to find the source of any blockage, then clear it out. Depending on the severity of the clog, they may also use chemical drain cleaners to unclog your pipes.

Many homeowners opt to avoid using chemicals in their home, but if you have an especially stubborn clog that doesn’t respond well to snaking or other DIY techniques, then it’s best to call a professional. They will have the proper equipment and experience to remove your clog without damaging your pipes, sinks, or other fixtures.

ARS/Rescue Rooter offers a specialized drain-cleaning product called DrainRight, which is 100% biodegradable and safe to use in your home. We use this product to liquefy and disperse grease, soap scum, and other waste buildup in your pipes.

Water heaters are highly complex pieces of equipment that should be installed only by fully licensed and experienced plumbers. Homeowners who attempt to install their own water heaters run the risk of serious damage, including shock and gas leaks.

Most new water heaters come with installation instructions and lots of warnings about working safely with gas, electricity and other piping. However, many of the complexities of plumbing and installing a new water heater can be daunting even for seasoned technicians.

If you are planning on replacing a traditional tank type water heater, the process generally takes about three hours, though the work will vary based on your needs and the size and type of your old unit. In addition to the tank, you may need to reroute water or gas piping, frame a wall, install drywall, extend electrical wiring and other additional work.

The cost of a water heater installation depends on the contractor you choose. Higher-quality contractors will charge more but will typically get the job done correctly the first time, saving you on future service calls.

Having your new water heater installed by a professional will also ensure that it is compliant with your local city’s plumbing codes. This means that the project will be inspected by one of your local city inspectors so they can ensure the work is done properly and safely.

A qualified plumber will be able to answer questions you may have about the installation process, such as how much a new tank costs, which type of unit to purchase and if the water heater is eligible for any tax credits or rebates. This will help you make an informed decision and ensure that your new water heater is the right one for you.

When you have a water heater installed by a plumber, you will receive a labor warranty on the work done. This warranty will protect you from unexpected repair bills if your new water heater breaks down due to work performed by the plumber.

If you have a new water heater installed by a retailer, it is important to communicate with the company about the quality of the product and any concerns or problems you may experience in the future. Retailers often have no control over the quality of the products they sell, so you should be sure to select a high-quality model.

Becoming a Brick Mason

Brick Mason

Before you choose to become a brick mason, it’s important to understand what this profession is all about. Learn about the job outlook, the Education required, and the salary range for this profession. A brick mason builds structures out of individual units and often lays these units in mortar. A brick mason’s job is highly demanding, and it requires a solid understanding of the construction industry.Brick Mason

Brick Mason Charleston SC builds structures by working with a wide variety of materials. They are also required to meet rigid specifications and adhere to precise measurements. As a result, the job requires extensive physical fitness. Moreover, brick masons must be able to work outdoors and lift and move heavy materials. In addition, they must be creative and quick to set bricks.

According to the Bureau of Labor Statistics, the employment outlook for brick masons is good. The number of brick and block masons working in the States is expected to grow by 10% over the next decade. This growth rate is much higher than the national average. However, brick masons earn lower wages than the national average wage earner.

While brick masons face many risks in the course of their work, their job outlook remained good in 2018. According to the Bureau of Labor Statistics, employment for masons will grow by 12% through 2026. This growth will depend on the industry. The demand for new construction will rise while existing structures will need renovation. The masons will be responsible for ensuring that existing structures are safe and aesthetically appealing. However, they will be working with heavy materials and are at risk of injuries. Therefore, it is imperative for them to wear protective gear.

In the States, brick masons are one of the most sought-after jobs in the construction industry. They work with bricks, concrete blocks, and natural stones to build buildings. In 2016, 292,500 brick masons were employed. The majority were cement masons or concrete finishers. They also tear down and rebuild chimneys and cut openings in walls, floors, and ceilings.

Brick masons typically have a high school diploma. However, the majority of masons learn the trade through apprenticeships and on-the-job training. Brick structures can last for hundreds of years. In addition, concrete can last for several decades. These materials form the foundation of everything from decorative patios to highways and huge dams.

The unemployment rate in this occupation was relatively low in 2018. Unemployment rates were particularly low in August and September, which is typically when construction projects are most active. However, the number of job vacancies in the sector declined sharply last year. This means that there was an adequate supply of workers to fill job openings.

If you want to become a brick mason, you will need to have a high school diploma and a background in construction. In addition, you will have to go through an apprenticeship program and obtain any necessary licensing. Throughout your training, you should continually improve your knowledge of the trade, your skills, and your overall abilities. In addition, brick masons need to have a good deal of stamina. This is essential because they spend a lot of time bending and standing. You can develop your stamina through cardiovascular exercises and other exercises.

In addition, brick masons must be physically fit and have great attention to detail. They must also be willing to lift heavy building materials. During the training process, brick masons can also ask questions of their mentors, who will usually reply by email. Aside from these, brick masons should also be able to follow blueprints and follow specific instructions.

Apprentices can work as brick masons for several years. During this period, they receive on-the-job training as well as classroom instruction. They usually receive sponsorship from masonry unions or employers and receive a living wage during their training. Apprenticeship programs typically last three to four years, and they include four32 classroom hours and 6,000 on-the-job training.

Brick masons typically spend two to four years learning their trade. This training involves learning the necessary skills and techniques that are unique to their employer. According to the Bureau of Labor Statistics, brick masons can earn as much as $54,311 a year. This salary is higher than the national average, but you can expect to make even more with experience. Despite the low starting salary, brick masons can expect to see an upward trend in jobs over the next decade, with a predicted 34% growth in the field.

Tired Of Your Home? Make Some Interior Design Changes!


Are you searching for ways to improve your home through interior design? There are many different things one can do to help your space, whether large or small a whole new and exciting look. The article below offers many great tips that will show you what can be done in any space to give it a fresh new look.


Set a budget for your interior-design project before you start any work. Costs for home-improvement projects can quickly spiral out of control if you don’t set a spending limit. While you can be a little flexible, you shouldn’t spend more than you can afford. Having a budget can help you be more creative as well.


A great interior design tip is to always be aware of space when you’re designing. If you go crazy with a room it might end up getting cluttered. No matter how nice looking and well decorated a room is, if there isn’t enough space to move around no one will even bother to go in it.


If you are designing a new kitchen in your house, it is beneficial to contact a professional contractor. Your ideas might involve electrical and plumbing work that is beyond your scope of expertise. By contacting a professional, they can help you to outline the exact project so it is done right and within budget.


If you have a backsplash in your kitchen that you really hate, consider painting it. Painting a backsplash is not a difficult task, and it can completely change the look of your kitchen. It is also a less-expensive option than removing and replacing the existing backsplash. You can even use a grout pen to paint in new grout lines when you are done.


As you can see from the above article, it doesn’t take much to add excitement and change up any size room. Stick to the tips you learned here and use them as a guide as you change around the style of your home. You can always come to the article to refer to the tips as you go along.


You can also visit our other website and post your article.


Makuu Farmers Association, People Collective Arts, Shake And Shift, Targeted Advertising, Marques Dent, European Advocacy, On Paper SEO, Glam Punk Rock, Tom Papers, Top Shelf High, kmgourmetpopcorn, Somerville Painting, Cakes By Maribelle, Company Owners Talk Business, Natural Swimming Pools, Sunrise Structured, Best Roofer In Ohio, Color Cork Flooring, PHG Constellation, Gabrieli Vanica, Asda Distric1, PQC Emblem, Grind Stone Media, Sad Biscuit, Empower Parenting Consultants, Allied Bathrooms , Bathroom One, Internet Usability Today, Inspire Works Marketing, Assistive Tech World, Web Design For Your Business, Construction Ideas, TEC Solarman, Usability And SEO, HVAC Programs, David For Crystals, Eco Libertarian, FV Plumber, White Head Carpentry, Expert Plumbing Laveenaz

Assistive Technology

Assistive technology supports individuals with disabilities, limited mobility, or other impairments. These devices or software solutions can help them to improve their daily lives, compensate for impairment, or carry out everyday activities. These products are typically used by people with physical and mental limitations, but they can also be used by people with no impairment or medical condition at all. Some products are specifically designed for individuals with physical or cognitive challenges, but others have a general appeal.

Assistive technology includes a wide range of devices, products, and services. It is often computer hardware or software and includes keyboards, pointing devices, and communication programs. In addition, assistive technologies include inclusive learning materials, specialized curriculum aids, power lifts, and eye-gaze and head trackers. The scope of these products is endless, and they are designed to improve the quality of life for individuals with physical and cognitive disabilities.

assistive technology

Assistive technology is typically software or hardware that is customized or modified to improve the function of a person with a disability. A device that enhances a child’s ability to communicate or use computer hardware is a type of assistive technology. However, medical devices do not fall under this category, since they are created for medical purposes and must be physical in nature. Further, a system that can help a person with language processing challenges is not assistive technology.

Assistive technology should be part of an individual’s individualized education program or IEP. The IEP should clearly state the person’s need for assistive technology. It should include a statement of special education and related services, which must provide the child with the tools to participate in the general curriculum with other students. Assistive technology must also be affordable, which is important for a child with a disability to get the most benefit from it.

Assistive technology can be a device, software, or an entire system. It can be an assistive technology for a person with a disability, or it can be a system for people with disabilities to use. Assistive technology can include a specialized curriculum and equipment for the user. Various types of devices are used to improve a person’s ability to communicate with their environment. There are many different types of devices available, and each type is used to improve the functionality of the individual with a disability.

There are many types of assistive technology. The most common types include wheelchairs and power lifts. Assistive technology helps students with mobility to communicate. ATIA members are also often able to help their patients with speech and communication. Assistive technology for the disabled includes computer hardware and software, including voice-activated devices and speech-to-text software. These products are also very useful for people with a hearing impairment.

Assistive technology is used to support a person with a disability. The term “assistive technology” refers to products and services designed to support a particular person’s mobility, speech, or sensory impairment. While a product is not a medical device, it can be used in a healthcare setting to help a person with their everyday activities. Assistive technology has many uses and can benefit both the user and the caregiver of an individual with a disability.

Some of the most common examples of assistive technology are speech-to-text software and devices. Other technologies, such as hearing aids, are used to improve students with physical impairment. For example, some assistive technology is used to help students with a medical condition. For instance, one in 12 children has a speech-to-text disability. Such a disability can cause the student to be frustrated and unable to communicate. Assistive technology is essential to improve a person’s quality of life.

Despite its name, assistive technology devices are often not medical devices. Instead, they are simply items, products, or systems that increase the functional capabilities of an individual with a disability. These devices are generally not medically-approved, but they may be used by a person with a disability to perform certain tasks. In some cases, the device is designed for the parent, and the child can use it to communicate with a physician.